外挂式插件编程思路【进阶篇】(8)
路由功能,单页面应用更加得心应手。
【index.html】
<!DOCTYPE html>
<html ng-app="myApp"  ng-controller="myhtml">
	<head>
		<meta charset="utf-8" />
		<title ng-bind="title"></title>
	</head>
	<body>
		<script src="index.js"></script>
	</body>
</html>
【index.js】
//electron 加入下面一行
if(typeof module === 'object') {window.module = module; module = undefined;}
class load_js{
js_list=[];
active_index=0;
back=null;
constructor(js_list,back)
{
this.js_list=js_list;
this.back=back;
this.load_js_one();
}
load_js_one()
{
let me=this;
var js = document.createElement("script");
document.getElementsByTagName("head")[0].appendChild(js);
js.src = this.js_list[this.active_index];
js.onload = js.onreadystatechange = function()
{
if (!this.readyState || 'loaded' === this.readyState || 'complete' === this.readyState) {
console.log('成功',js.src);
if(me.active_index==me.js_list.length-1)
{
me.back();
}else{
me.active_index=me.active_index+1;
me.load_js_one();
}
}
}
}
}
new load_js(['jquery.min.js','angular.min.js','angular-route.min.js','app.js'],function()
{
//debugger;
console.log('end');
console.log($);
$("body").append(`
<style>
dt {
border: 1px rgba(0,0,0,0.05) solid; border-bottom:0;
list-style: none; margin: 0;
background: rgba(0,0,0,0.02);
border-radius: 8px 8px 0px 0px;
overflow: hidden;
}
dd {
border: 1px rgba(0,0,0,0.05) solid; border-top:0;
list-style: none; margin: 0;
padding: 10px 10px 10px 10px;
border-radius:0px 0px 8px 8px;
}
dt span {
background: rgba(0,0,0,0.03);
display: inline-block; height: 40px; line-height: 40px; padding: 0px 20px 0px 20px;
cursor: pointer;
border-left: 1px rgba(0,0,0,0.05) solid;
}
dt span:nth-child(1) {border-left:0px;}
dt span.active {
background:{{style[style_selected_index].color}};
color:#fff; font-weight: bold;
}
</style>
<select ng-model="style_selected_index" ng-change="style_change()">
<option value="{{$index}}" ng-selected="$index==style_selected_index" ng-repeat="x in style">{{x.name}}</option>
</select>
<div id="tab_body">
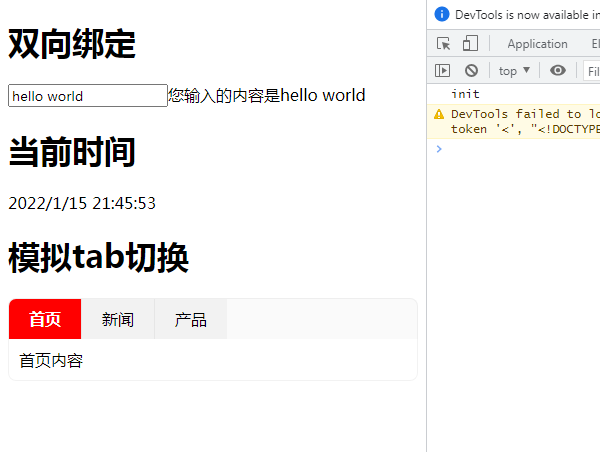
<h1>模拟tab切换</h1>
<dl>
<dt><span class="{{$index==tab.active_index ? 'active':''}}" ng-repeat="x in tab.list" ng-click="tab.change($index)">{{x.title}}</span></dt>
<dd>{{tab.list[tab.active_index].content}}</dd>
</dl>
</div>
<ul>
<li><a href="#!/">首页</a></li>
<li><a href="#!/computers">电脑</a></li>
<li><a href="#!/printers">打印机</a></li>
<li><a href="#!/blabla">其他</a></li>
</ul>
<div ng-view></div>
`);
//加载tab html
var app=ng_app();
app.init(function()
{
//tab标签相关
app.$scope.tab={
active_index:0,
list:[
{title:'首页',content:'首页内容'},
{title:'新闻',content:'新闻列表'},
{title:'产品',content:'产品列表'},
],
change:function(index){
console.log('change',index);
if(app.$scope.tab.active_index!=index) app.$scope.tab.active_index=index;
}
};
app.$scope.style_selected_index='0';
app.$scope.style=[
{name:'红色',color:'#ff0000'},
{name:'绿色',color:'#008c00'},
{name:'蓝色',color:'#0000ea'},
];
app.$scope.title="外挂式插件编程思路(进阶)by野生程序猿-杂烧";
app.$scope.style_change=function()
{
console.log(app.$scope.style_selected_index);
}
app.$routeProvider.when('/',{template:'这是首页页面'});
app.$routeProvider.when('/computers',{template:'这是电脑分类页面'});
app.$routeProvider.when('/printers',{template:'这是打印机页面'});
app.$routeProvider.otherwise({redirectTo:'/'});
app.update();//页面渲染
});
});【app.js】
function ng_app()
{
	var MyApp=
	{
		app:null,
		init:function(back)
		{
			console.log('init');
			var me=this;
			var app = angular.module('myApp',['ngRoute']);
			app.controller("myhtml",function($scope, $http,$window,$compile, $route)
			{
				$scope.$route = $route;
				me.$scope=$scope;
				me.$http=$http;
				me.$window=$window;
				me.$compile=$compile;

				back();
			});
			app.config(function ($routeProvider) {
			    me.$routeProvider=$routeProvider;

			});
			this.app=app;
		}
		,route:function(list)
		{
			console.log(list);
			this.app.config(['$routeProvider', function($routeProvider){
				console.log('$routeProvider');
				console.log($routeProvider);
				for(var i in list)
				{
					$routeProvider.when(list[i].url,list[i].template);
				}
				$routeProvider.otherwise({redirectTo:'/'});
			}]);
		}
		//更新模板渲染 优化ng频繁更新有报错,这里加1毫秒延迟 避免报错
		,update:function(){
			var me=this;
			setTimeout(function(){
				try{
					me.$scope.$apply();
				}catch(e){}
			},1);
		},
		//配合jq使用,jq后的模板,重新渲染
		html:function(html)
		{
			var that=this;
			try{
				var result=that.$compile(html)(that.$scope);
				if(result.selector)//假设存在 this_tpl_new.selector 则认为ng变量不存在失败了
				{
					//console.error(this_tpl_new.selector);
					var result=html;
				}
			}catch(e){
				var result=html;
			}
			return result;

		},
		new:function(){
			return this;
		}

	}
	var result=MyApp.new();
	return result;
};
加入路由功能,可实现复杂的单页面应用,同时低代码模式的技术栈更丰富。